Documentation
Duo Trusted Endpoints - Google Verified Access for Chromebooks
Last Updated: October 31st, 2024Contents
Try the new Chrome Enterprise Device Trust Connector for improved trusted device verification for enterprise-managed Chromebooks.
Duo's Trusted Endpoints feature secures your sensitive applications by ensuring that only known devices can access Duo protected services. When a user authenticates via the Duo Prompt, we'll check for the access device's management status. You can monitor access to your applications from trusted and untrusted devices, and optionally block access from devices not trusted by your organization.
Trusted Endpoints is part of the Duo Essentials, Duo Advantage, and Duo Premier plans.
Overview
Google's Verified Access is a hardware-backed method of device identity and status confirmation. When a user authenticates via the Duo Prompt using a Chromebook, Google Verified Access attests that the Chromebook is enrolled in enterprise device management and is thus compliant with all enterprise policies.
Prerequisites
- Access to the Duo Admin Panel as an administrator with the Owner, Administrator, or Application Manager administrative roles.
- Chrome devices must be enrolled in your Google domain for enterprise management.
- You must not be using SAML-based Single Sign-On for Chrome Devices. This feature is not compatible with Google Verified Access.
Create the Google Verified Access for Chromebooks Integration
- Log in to the Duo Admin Panel and navigate to Devices → Trusted Endpoints.
- If this is your first management integration, click the Get started button at the bottom of the Trusted Endpoints introduction page. If you're adding another management integration, click the Add Integration button you see at the top of the page instead.
- On the "Add Management Tools Integration" page, locate Google Verified Access for Chromebooks in the list of "Device Management Tools" and click the Add this integration selector.
- Choose Chrome OS from the "Recommended" options, and then click the Add button.
The new Google Verified Access for Chromebooks integration is created in the "Disabled" state. You'll turn it on when you're ready to apply your Duo trusted endpoints policy.
Keep the Duo Admin Panel open in your browser. You'll need to refer back to the Google Verified Access management integration page to complete the G Suite configuration steps.
Configure Duo Verified Access in G Suite
Turn on Verified Access
-
Log on to the G Suite Admin console as an administrator and navigate to Devices, and then use the left-side navigation to go to Chrome → Settings → Device.
-
In the "Enrollment & Access" section, locate the "Verified Access" setting and select Enable for Content Protection.
-
Change the "Verified Mode" setting to Require verified mode boot for verified access.
-
Copy the account string duo-verified-access@duo-verified-access.iam.gserviceaccount.com from the Admin Panel and paste it in "Services with Full Access" box (described as "Service accounts which are allowed to receive device ID").
-
Click Save.
Deploy the Duo Verified Access Extension
-
While still logged in to the G Suite Admin console as an administrator, navigate to Devices → Chrome → Apps & extensions → Users & browsers.
-
On the "Users & browsers" tab, click the plus sign in the lower right and select "Add from Chrome Web Store" (the icon that displays the Chrome browser logo).
-
Search the Chrome Web Store extensions for Google Verified Access by Duo. Click it to view the extension details, and click Select on the "Google Verified Access by Duo" details page.
-
Change the "Installation Policy" for the "Google Verified Access by Duo" extension to Force install.
-
Click on the "Google Verified Access by Duo" extension to open its settings. Enable the Allow enterprise challenge setting in the "Certificate Management" section.
-
Click SAVE at the top of the page.
Add G Suite Domains to Duo
-
Return to your Google Verified Access for Chromebooks management integration page in the Duo Admin Panel.
-
Enter a comma separated list of your G Suite domains in the "Enter G Suite Domains" box and click Save. Most organizations will only need to specify one G Suite domain.
At this point the configured integration is disabled and applies to no users until you finish your deployment.
Finish Trusted Endpoints Deployment
After creating the Google Verified Access management integration, set the Trusted Endpoints policy to start checking for Chromebook enrollment as users authenticate to Duo-protected services and applications.
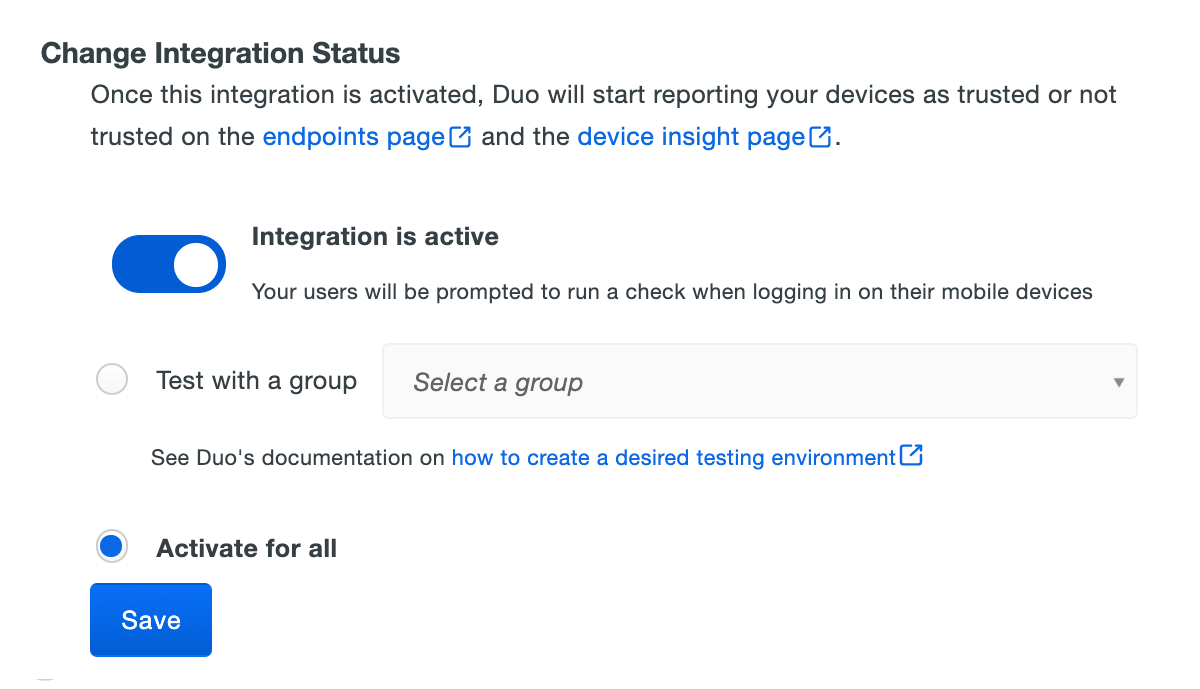
When your trusted endpoints policy is applied to your Duo applications, return to the Google Verified Access trusted endpoint management integration in the Admin Panel. The "Change Integration Status" section of the page shows the current integration status (disabled by default after creation). You can choose to either activate this management integration only for members of a specified test group, or activate for all users.

The Device Insight and Endpoints pages in the Duo Admin Panel show which access devices are trusted/managed and enrolled in Google Verified Access.
Verify Your Setup
Authenticate to a protected application using an enrolled Chromebook.
When the trusted endpoints policy is set to just check access devices, users receive access to the application (assuming the Chromebook passes all other policy verification), and Duo records the trusted or untrusted status of that device.
If the trusted endpoints policy blocks access from unmanaged devices and Duo successfully verifies the Chromebook's management status and configuration against the required policy settings then the user receives access to the protected application.
If the Chromebook fails the configuration and policy checks then Duo denies application access.
Troubleshooting
Need some help? Take a look at our Trusted Endpoints Knowledge Base articles or Community discussions. For further assistance, contact Support.
